Narrate section
Fundamentals and Standards
This chapter will reveal some important basic information you will use in the rest of this course. In addition, we will also introduce you to a structure where we establish some standards to decrease the chances of producing buggy or incompatible codes.
Required Production Environment 
Informative · Practical
We have provided some information in prerequisites. This information includes programming language requirements, required libraries, text editors, build environments, and operating system requirements. For installing our library, odak, we strongly advise using the version in the source repository. You can install odak from the source repository using your favorite terminal and operating system:
Note that your production environment meaning your computer and required software for this course is important. To avoid wasting time in the next chapters and get the most from this lecture, please ensure that you have dedicated enough time to set everything up as it should.
Production Standards 
Informative
In this course, you will be asked to code and implement simulations related to the physics of light. Your work, meaning your production, should strictly follow certain habits to help build better tools and developments.
Subversion and Revision Control
Informative · Practical
As you develop your code for your future homework and projects, you will discover that many things could go wrong. For example, the hard drive that contains the only copy of your code could be damaged, or your most trusted friend (so-called) can claim that she compiled most of the work, and gets her credit for it, although that is not the case. These are just a few potential cases that may happen to you. On the other hand, in business life, poor code control can cause companies to lose money by releasing incorrect codes or researchers to lose their reputations as their work is challenging to replicate. How do you claim in that case that you did your part? What is the proper method to avoid losing data, time, effort, and motivation? In short, what is the way to stay out of trouble?
This is where the subversion, authoring, and revision control systems come into play, especially, for the example cases discussed in the previous paragraph. In today's world, Git is a widespread version control system adopted by major websites such as GitHub or Gitlab. We will not dive deep into how to use Git and all its features, but I will try to highlight parts that are essential for your workflow. I encourage you to use Git for creating a repository for every one of your tasks in the future. You can either keep this repository in your local and constantly back up somewhere else (suggested to people knowing what they are doing) or use these online services such as GitHub or Gitlab. I also encourage you to use the online services if you are a beginner.
For each operating system, installing Git has its processes, but for an Ubuntu operating system, it is as easy as typing the following commands in your terminal:
Let us imagine that you want to start a repository on GitHub. Make sure to create a private repository, and please only go public with any repository once you feel it is at a state where it can be shared with others. Once you have created your repository on GitHub, you can clone the repository using the following command in a terminal:
You can find out about the repository's location by visiting the repository's website that you have created. The location is typically revealed by clicking the code button, as depicted in the below screenshot.
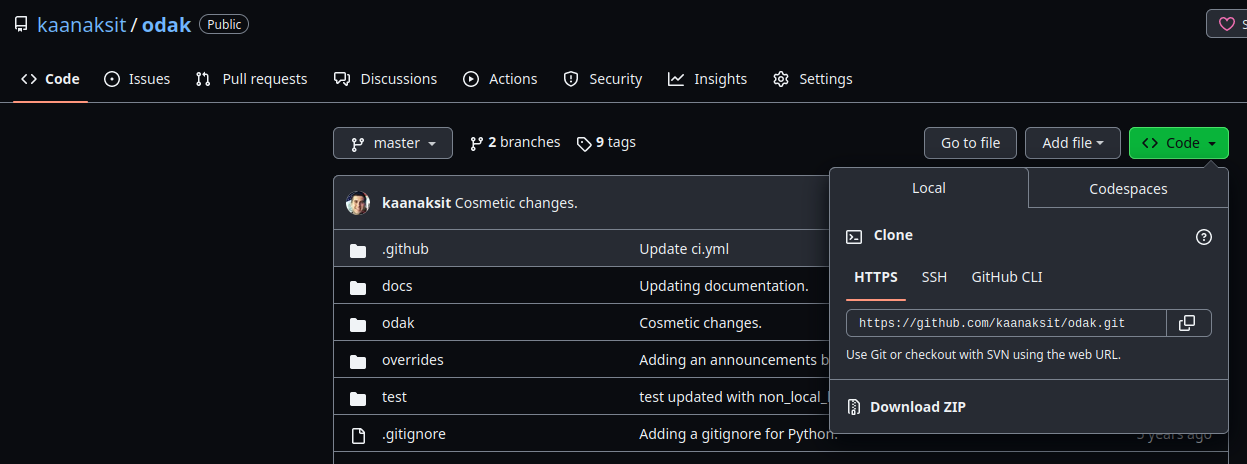
For example, in the above case, the command should be updated with the following:
If you want to share your private repository with someone you can go into the settings of your repository in its webpage and navigate to the collaborators section. This way, you can assign roles to your collaborators that best suit your scenario.
Secure your account
If you are using GitHub for your development, I highly encourage you to consider using two-factor authentication.
Git Basics
Informative · Practical
If you want to add new files to your subversion control system, use the following in a terminal:
You may want to track the status of the files (whether they are added, deleted, etc.)
And later, you can update the online copy (remote server or source) using the following:In some cases, you may want to include large binary files in your project, such as a paper, video, or any other media you want to archive within your project repository.
For those cases, using just git may not be the best opinion, as Git works on creating a history of files and how they are changed at each commit, this history will likely be too bulky and oversized.
Thus, cloning a repository could be slow when large binary files and Git come together.
Assuming you are on an Ubuntu operating system, you can install the Large File Support (LFS) for Git by typing these commands in your terminal:
Once you have the LFS installed in your operating system, you can then go into your repository and enable LFS:
Now is the time to let your LFS track specific files to avoid overcrowding your Git history.
For example, you can track the *.pdf extension, meaning all the PDF files in your repository by typing the following command in your terminal:
Finally, ensure the tracking information and LFS are copied to your remote/source repository. You can do that using the following commands in your terminal:
When projects expand in size, it's quite feasible for hundreds of individuals to collaborate within the same repository. This is particularly prevalent in sizable software development initiatives or open-source projects with a substantial contributor base. The branching system is frequently employed in these circumstances.
Consider you are in a software development team and you want to introduce new features or changes to a project without affecting the main or "master" branch. You need to firstly create a new branch by using the following command which creates a new branch named BRANCHNAME but does not switch to it. This new branch has the same contents as the current branch (a copy of the current branch).
Then you can switch to the new brach by using the command:
Or use this command to create and switch to a new branch immediately
After editing the new branch, you may want to update the changes to the master or main branch. This command merges the branch named BRANCHNAME into the current branch. You must resolve any conflicts to complete the merge.
We recommend an interactive, visual method for learning Git commands and branching online: learngitbranching. More information can be found in the offical Git documentation: Git docs.
Coding Standards 
Informative · Practical
I encourage our readers to follow the methods of coding highlighted here. Following the methods that I am going to explain is not only crucial for developing replicable projects, but it is also vital for allowing other people to read your code with the least amount of hassle.
Where do I find out more about Python coding standards?
Python Enhancement Proposals documentation provides a great deal of information on modern ways to code in Python.
Avoid using long lines.
Please avoid having too many characters in one line. Let us start with a bad example:
def light_transport(wavelength, distances, resolution, propagation_type, polarization, input_field, output_field, angles):
      pass
      return results
As you can observe, the above function requires multiple inputs to be provided. Try making the inputs more readable by breaking lines and in some cases, you can also provide the requested type for an input and a default value to guide your users:
def light_transport(
                    wavelength,
                    distances,
                    resolution,
                    propagation_type : str,
                    polarization = 'vertical',
                    input_field = torch.rand(1, 1, 100, 100),
                    output_field = torch.zeros(1, 1, 100, 100),
                    angles= [0., 0., 0.]
                   ):
    pass
    return results
Leave spaces between commands, variables, and functions
Please avoid writing code like a train of characters. Here is a terrible coding example:
Please leave spaces after each comma, ,, and mathematical operation.
So now, we can correct the above example as in below:
Please also leave two lines of space between the two functions. Here is a bad example again:
Instead, it should be:
Add documentation
For your code, please make sure to add the necessary documentation. Here is a good example of doing that:
def add(x, y):
    """
    A function to add two values together.

    Parameters
    ==========
    x         : float
                First input value.
    y         : float
                Second input value.

    Returns
    =======
    result    : float
                Result of the addition.
    """
    result = x + y
    return result
Use a code-style checker and validator
There are also code-style checkers and code validators that you can adapt to your workflows when coding.
One of these code-style checkers and validators I use in my projects is pyflakes.
On an Ubuntu operating system, you can install pyflakes easily by typing these commands into your terminal:
It could tell you about missing imports or undefined or unused variables. You can use it on any Python script very easily:
In addition, I use flake8 and autopep8 for standard code violations.
To learn more about these, please read the code section of the contribution guide.
Naming variables
When naming variables use lower case letters and make sure that the variables are named in an explanatory manner.
Please also always use underscore as a replacement of space.
For example if you are going to create a variable for storing reconstructed image at some image plane, you can name that variable as reconstructions_image_planes.
Use fewer imports
When it comes to importing libraries in your code, please make sure to use a minimal amount of libraries. Using a few libraries can help you keep your code robust and working over newer generations of libraries. Please stick to the libraries suggested in this course when coding for this course. If you need access to some other library, please do let us know!
Fixing bugs
Often, you can encounter bugs in your code.
To fix your code in such cases, I would like you to consider using a method called Rubber duck debugging or Rubber ducking.
The basic idea is to be able to express your code to a third person or yourself line by line.
Explaining line by line could help you see what is wrong with your code.
I am sure there are many recipes for solving bugs in codes.
I tried introducing you to one that works for me.
Have a requirements.txt
Please also make sure to have a requirements.txt in the root directory of your repository.
For example, in this course your requirements.txt would look like this:
This way, a future user of your code could install the required libraries by following a simple command in a terminal:
Always use the same function for saving and loading
Most issues in every software project come from repetition.
Imagine if you want to save and load images inside a code after some processing.
If you rely on manually coding a save and load routine in every corner of the same code, it is likely that when you change one of these saving or loading routines, you must modify the others.
In other words, do not rediscover what you have already known.
Instead, turn it into a Lego brick you can use whenever needed.
For saving and loading images, please rely on functions in odak to avoid any issues.
For example, if I want to load a sample image called letter.jpeg, I can rely on this example:
import odak
image = odak.learn.tools.load_image(
                                    'letter.jpeg',
                                    torch_style = True, # (1)
                                    normalizeby = 255. # (2)
                                   )
- If you set this flag to True, the image will be loaded as [ch x m x n], where ch represents the number of color channels (e.g., typically three). In case of False, it will be loaded as [m x n x ch].
- If you provide a floating number here, the image to be loaded will be divived with that number.
For example, if you have a 8-bit image (0-255) and if you provide
normalizeby = 2.0, the maximum value that you can expect is 255 / 2. = 127.5.
Odak also provides a standard method for saving your torch tensors as image files:
odak.learn.tools.save_image(
                            'copy.png',
                            image,
                            cmin = 0., # (1)
                            cmax = 1., # (2)
                            color_depth = 8 # (3)
                           )
- Minimum expected value for torch tensor
image. - Maximum expected value for torch tensor
image. - Pixel depth of the image to be saved, default is 8-bit.
You may want to try the same code with different settings in some code development.
In those cases, I create a separate settings folder in the root directory of my projects and add JSON files that I can load for testing different cases.
To explain the case better, let us assume we will change the number of light sources in some simulations.
Let's first assume that we create a settings file as settings/experiment_000.txt in the root directory and fill it with the following content:
In the rest of my code, I can read, modify and save JSON files using odak functions:
import odak
settings = odak.tools.load_dictionary('./settings/experiment_000.txt')
settings['light source']['count'] = 10
odak.tools.save_dictionary(settings, './settings/experiment_000.txt')
This way, you do not have to memorize the variables you used for every experiment you conducted with the same piece of code. You can have a dedicated settings file for each experiment.
Create unit tests
Suppose your project is a library containing multiple valuable functions for developing other projects.
In that case, I encourage you to create unit tests for your library so that whenever you update it, you can see if your updates break anything in that library.
For this purpose, consider creating a test directory in the root folder of your repository.
In that directory, you can create separate Python scripts for testing out various functions of your library.
Say there is a function called add in your project MOSTAWESOMECODEEVER, so your test script test/test_add.py should look like this:
import MOSTAWESOMECODEEVER

def test():
    ground_truth = 3 + 5
    result = MOSTAWESOMECODEEVER.add(3, 5)
    if ground_trurth == result:
        assert True == True
    assert False == True


if __name__ == '__main__':
    sys.exit(test())
You may accumulate various unit tests in your test directory.
To test them all before pushing them to your repository, you can rely on pytest.
You can install pytest using the following command in your terminal:
Once installed, you can navigate to your repository's root directory and call pytest to test things out:
If anything is wrong with your unit tests, which validate your functions, pytest will provide a detailed explanation.Suppose your project is a library containing multiple valuable functions for developing other projects.
In that case, I encourage you to create unit tests for your library so that whenever you update it, you can see if your updates break anything in that library.
For this purpose, consider creating a test directory in the root folder of your repository.
In that directory, you can create separate Python scripts for testing out various functions of your library.
Say there is a function called add in your project MOSTAWESOMECODEEVER, so your test script test/test_add.py should look like this:
import MOSTAWESOMECODEEVER

def test():
    ground_truth = 3 + 5
    result = MOSTAWESOMECODEEVER.add(3, 5)
    if ground_trurth == result:
        assert True == True
    assert False == True


if __name__ == '__main__':
    sys.exit(test())
You may accumulate various unit tests in your test directory.
To test them all before pushing them to your repository, you can rely on pytest.
You can install pytest using the following command in your terminal:
Once installed, you can navigate to your repository's root directory and call pytest to test things out:
If anything is wrong with your unit tests, which validate your functions, pytest will provide a detailed explanation.
Set a licence
If you want to distribute your code online, consider adding a license to avoid having difficulties related to sharing with others.
In other words, you can add LICENSE.txt in the root directory of your repository.
To determine which license works best for you, consider visiting this guideline.
When choosing a license for your project, consider tinkering about whether you agree people are building a product out of your work or derivate, etc.
Lab work: Prepare a project repository
Please prepare a sample repository on GitHub using the information provided in the above sections. Here are some sample files that may inspire you and help you structure your project in good order:
Mozilla Public License Version 2.0
==================================

1. Definitions
--------------

1.1. "Contributor"
    means each individual or legal entity that creates, contributes to
    the creation of, or owns Covered Software.

1.2. "Contributor Version"
    means the combination of the Contributions of others (if any) used
    by a Contributor and that particular Contributor's Contribution.

1.3. "Contribution"
    means Covered Software of a particular Contributor.

1.4. "Covered Software"
    means Source Code Form to which the initial Contributor has attached
    the notice in Exhibit A, the Executable Form of such Source Code
    Form, and Modifications of such Source Code Form, in each case
    including portions thereof.

1.5. "Incompatible With Secondary Licenses"
    means

    (a) that the initial Contributor has attached the notice described
        in Exhibit B to the Covered Software; or

    (b) that the Covered Software was made available under the terms of
        version 1.1 or earlier of the License, but not also under the
        terms of a Secondary License.

1.6. "Executable Form"
    means any form of the work other than Source Code Form.

1.7. "Larger Work"
    means a work that combines Covered Software with other material, in
    a separate file or files, that is not Covered Software.

1.8. "License"
    means this document.

1.9. "Licensable"
    means having the right to grant, to the maximum extent possible,
    whether at the time of the initial grant or subsequently, any and
    all of the rights conveyed by this License.

1.10. "Modifications"
    means any of the following:

    (a) any file in Source Code Form that results from an addition to,
        deletion from, or modification of the contents of Covered
        Software; or

    (b) any new file in Source Code Form that contains any Covered
        Software.

1.11. "Patent Claims" of a Contributor
    means any patent claim(s), including without limitation, method,
    process, and apparatus claims, in any patent Licensable by such
    Contributor that would be infringed, but for the grant of the
    License, by the making, using, selling, offering for sale, having
    made, import, or transfer of either its Contributions or its
    Contributor Version.

1.12. "Secondary License"
    means either the GNU General Public License, Version 2.0, the GNU
    Lesser General Public License, Version 2.1, the GNU Affero General
    Public License, Version 3.0, or any later versions of those
    licenses.

1.13. "Source Code Form"
    means the form of the work preferred for making modifications.

1.14. "You" (or "Your")
    means an individual or a legal entity exercising rights under this
    License. For legal entities, "You" includes any entity that
    controls, is controlled by, or is under common control with You. For
    purposes of this definition, "control" means (a) the power, direct
    or indirect, to cause the direction or management of such entity,
    whether by contract or otherwise, or (b) ownership of more than
    fifty percent (50%) of the outstanding shares or beneficial
    ownership of such entity.

2. License Grants and Conditions
--------------------------------

2.1. Grants

Each Contributor hereby grants You a world-wide, royalty-free,
non-exclusive license:

(a) under intellectual property rights (other than patent or trademark)
    Licensable by such Contributor to use, reproduce, make available,
    modify, display, perform, distribute, and otherwise exploit its
    Contributions, either on an unmodified basis, with Modifications, or
    as part of a Larger Work; and

(b) under Patent Claims of such Contributor to make, use, sell, offer
    for sale, have made, import, and otherwise transfer either its
    Contributions or its Contributor Version.

2.2. Effective Date

The licenses granted in Section 2.1 with respect to any Contribution
become effective for each Contribution on the date the Contributor first
distributes such Contribution.

2.3. Limitations on Grant Scope

The licenses granted in this Section 2 are the only rights granted under
this License. No additional rights or licenses will be implied from the
distribution or licensing of Covered Software under this License.
Notwithstanding Section 2.1(b) above, no patent license is granted by a
Contributor:

(a) for any code that a Contributor has removed from Covered Software;
    or

(b) for infringements caused by: (i) Your and any other third party's
    modifications of Covered Software, or (ii) the combination of its
    Contributions with other software (except as part of its Contributor
    Version); or

(c) under Patent Claims infringed by Covered Software in the absence of
    its Contributions.

This License does not grant any rights in the trademarks, service marks,
or logos of any Contributor (except as may be necessary to comply with
the notice requirements in Section 3.4).

2.4. Subsequent Licenses

No Contributor makes additional grants as a result of Your choice to
distribute the Covered Software under a subsequent version of this
License (see Section 10.2) or under the terms of a Secondary License (if
permitted under the terms of Section 3.3).

2.5. Representation

Each Contributor represents that the Contributor believes its
Contributions are its original creation(s) or it has sufficient rights
to grant the rights to its Contributions conveyed by this License.

2.6. Fair Use

This License is not intended to limit any rights You have under
applicable copyright doctrines of fair use, fair dealing, or other
equivalents.

2.7. Conditions

Sections 3.1, 3.2, 3.3, and 3.4 are conditions of the licenses granted
in Section 2.1.

3. Responsibilities
-------------------

3.1. Distribution of Source Form

All distribution of Covered Software in Source Code Form, including any
Modifications that You create or to which You contribute, must be under
the terms of this License. You must inform recipients that the Source
Code Form of the Covered Software is governed by the terms of this
License, and how they can obtain a copy of this License. You may not
attempt to alter or restrict the recipients' rights in the Source Code
Form.

3.2. Distribution of Executable Form

If You distribute Covered Software in Executable Form then:

(a) such Covered Software must also be made available in Source Code
    Form, as described in Section 3.1, and You must inform recipients of
    the Executable Form how they can obtain a copy of such Source Code
    Form by reasonable means in a timely manner, at a charge no more
    than the cost of distribution to the recipient; and

(b) You may distribute such Executable Form under the terms of this
    License, or sublicense it under different terms, provided that the
    license for the Executable Form does not attempt to limit or alter
    the recipients' rights in the Source Code Form under this License.

3.3. Distribution of a Larger Work

You may create and distribute a Larger Work under terms of Your choice,
provided that You also comply with the requirements of this License for
the Covered Software. If the Larger Work is a combination of Covered
Software with a work governed by one or more Secondary Licenses, and the
Covered Software is not Incompatible With Secondary Licenses, this
License permits You to additionally distribute such Covered Software
under the terms of such Secondary License(s), so that the recipient of
the Larger Work may, at their option, further distribute the Covered
Software under the terms of either this License or such Secondary
License(s).

3.4. Notices

You may not remove or alter the substance of any license notices
(including copyright notices, patent notices, disclaimers of warranty,
or limitations of liability) contained within the Source Code Form of
the Covered Software, except that You may alter any license notices to
the extent required to remedy known factual inaccuracies.

3.5. Application of Additional Terms

You may choose to offer, and to charge a fee for, warranty, support,
indemnity or liability obligations to one or more recipients of Covered
Software. However, You may do so only on Your own behalf, and not on
behalf of any Contributor. You must make it absolutely clear that any
such warranty, support, indemnity, or liability obligation is offered by
You alone, and You hereby agree to indemnify every Contributor for any
liability incurred by such Contributor as a result of warranty, support,
indemnity or liability terms You offer. You may include additional
disclaimers of warranty and limitations of liability specific to any
jurisdiction.

4. Inability to Comply Due to Statute or Regulation
---------------------------------------------------

If it is impossible for You to comply with any of the terms of this
License with respect to some or all of the Covered Software due to
statute, judicial order, or regulation then You must: (a) comply with
the terms of this License to the maximum extent possible; and (b)
describe the limitations and the code they affect. Such description must
be placed in a text file included with all distributions of the Covered
Software under this License. Except to the extent prohibited by statute
or regulation, such description must be sufficiently detailed for a
recipient of ordinary skill to be able to understand it.

5. Termination
--------------

5.1. The rights granted under this License will terminate automatically
if You fail to comply with any of its terms. However, if You become
compliant, then the rights granted under this License from a particular
Contributor are reinstated (a) provisionally, unless and until such
Contributor explicitly and finally terminates Your grants, and (b) on an
ongoing basis, if such Contributor fails to notify You of the
non-compliance by some reasonable means prior to 60 days after You have
come back into compliance. Moreover, Your grants from a particular
Contributor are reinstated on an ongoing basis if such Contributor
notifies You of the non-compliance by some reasonable means, this is the
first time You have received notice of non-compliance with this License
from such Contributor, and You become compliant prior to 30 days after
Your receipt of the notice.

5.2. If You initiate litigation against any entity by asserting a patent
infringement claim (excluding declaratory judgment actions,
counter-claims, and cross-claims) alleging that a Contributor Version
directly or indirectly infringes any patent, then the rights granted to
You by any and all Contributors for the Covered Software under Section
2.1 of this License shall terminate.

5.3. In the event of termination under Sections 5.1 or 5.2 above, all
end user license agreements (excluding distributors and resellers) which
have been validly granted by You or Your distributors under this License
prior to termination shall survive termination.

************************************************************************
*                                                                      *
*  6. Disclaimer of Warranty                                           *
*  -------------------------                                           *
*                                                                      *
*  Covered Software is provided under this License on an "as is"       *
*  basis, without warranty of any kind, either expressed, implied, or  *
*  statutory, including, without limitation, warranties that the       *
*  Covered Software is free of defects, merchantable, fit for a        *
*  particular purpose or non-infringing. The entire risk as to the     *
*  quality and performance of the Covered Software is with You.        *
*  Should any Covered Software prove defective in any respect, You     *
*  (not any Contributor) assume the cost of any necessary servicing,   *
*  repair, or correction. This disclaimer of warranty constitutes an   *
*  essential part of this License. No use of any Covered Software is   *
*  authorized under this License except under this disclaimer.         *
*                                                                      *
************************************************************************

************************************************************************
*                                                                      *
*  7. Limitation of Liability                                          *
*  --------------------------                                          *
*                                                                      *
*  Under no circumstances and under no legal theory, whether tort      *
*  (including negligence), contract, or otherwise, shall any           *
*  Contributor, or anyone who distributes Covered Software as          *
*  permitted above, be liable to You for any direct, indirect,         *
*  special, incidental, or consequential damages of any character      *
*  including, without limitation, damages for lost profits, loss of    *
*  goodwill, work stoppage, computer failure or malfunction, or any    *
*  and all other commercial damages or losses, even if such party      *
*  shall have been informed of the possibility of such damages. This   *
*  limitation of liability shall not apply to liability for death or   *
*  personal injury resulting from such party's negligence to the       *
*  extent applicable law prohibits such limitation. Some               *
*  jurisdictions do not allow the exclusion or limitation of           *
*  incidental or consequential damages, so this exclusion and          *
*  limitation may not apply to You.                                    *
*                                                                      *
************************************************************************

8. Litigation
-------------

Any litigation relating to this License may be brought only in the
courts of a jurisdiction where the defendant maintains its principal
place of business and such litigation shall be governed by laws of that
jurisdiction, without reference to its conflict-of-law provisions.
Nothing in this Section shall prevent a party's ability to bring
cross-claims or counter-claims.

9. Miscellaneous
----------------

This License represents the complete agreement concerning the subject
matter hereof. If any provision of this License is held to be
unenforceable, such provision shall be reformed only to the extent
necessary to make it enforceable. Any law or regulation which provides
that the language of a contract shall be construed against the drafter
shall not be used to construe this License against a Contributor.

10. Versions of the License
---------------------------

10.1. New Versions

Mozilla Foundation is the license steward. Except as provided in Section
10.3, no one other than the license steward has the right to modify or
publish new versions of this License. Each version will be given a
distinguishing version number.

10.2. Effect of New Versions

You may distribute the Covered Software under the terms of the version
of the License under which You originally received the Covered Software,
or under the terms of any subsequent version published by the license
steward.

10.3. Modified Versions

If you create software not governed by this License, and you want to
create a new license for such software, you may create and use a
modified version of this License if you rename the license and remove
any references to the name of the license steward (except to note that
such modified license differs from this License).

10.4. Distributing Source Code Form that is Incompatible With Secondary
Licenses

If You choose to distribute Source Code Form that is Incompatible With
Secondary Licenses under the terms of this version of the License, the
notice described in Exhibit B of this License must be attached.

Exhibit A - Source Code Form License Notice
-------------------------------------------

  This Source Code Form is subject to the terms of the Mozilla Public
  License, v. 2.0. If a copy of the MPL was not distributed with this
  file, You can obtain one at http://mozilla.org/MPL/2.0/.

If it is not possible or desirable to put the notice in a particular
file, then You may include the notice in a location (such as a LICENSE
file in a relevant directory) where a recipient would be likely to look
for such a notice.

You may add additional accurate notices of copyright ownership.

Exhibit B - "Incompatible With Secondary Licenses" Notice
---------------------------------------------------------

  This Source Code Form is "Incompatible With Secondary Licenses", as
  defined by the Mozilla Public License, v. 2.0.
Ahmet Hamdi Güzel
Ahmet Serdar Karadeniz
David Robert Walton
David Santiago Morales Norato
Henry Kam
Doğa Yılmaz
Jeanne Beyazian
Jialun Wu
Josef Spjut
Koray Kavaklı
Liang Shi
Mustafa Doğa Doğan
Praneeth Chakravarthula
Runze Zhu
Weijie Xie
Yujie Wang
Yuta Itoh
Ziyang Chen
Yicheng Zhan
Yiyang Wu
Xinge Yang
# Contributor Covenant Code of Conduct

## Our Pledge

We as members, contributors, and leaders pledge to make participation in our
community a harassment-free experience for everyone, regardless of age, body
size, visible or invisible disability, ethnicity, sex characteristics, gender
identity and expression, level of experience, education, socio-economic status,
nationality, personal appearance, race, religion, or sexual identity
and orientation.

We pledge to act and interact in ways that contribute to an open, welcoming,
diverse, inclusive, and healthy community.

## Our Standards

Examples of behavior that contributes to a positive environment for our
community include:

* Demonstrating empathy and kindness toward other people
* Being respectful of differing opinions, viewpoints, and experiences
* Giving and gracefully accepting constructive feedback
* Accepting responsibility and apologizing to those affected by our mistakes,
  and learning from the experience
* Focusing on what is best not just for us as individuals, but for the
  overall community

Examples of unacceptable behavior include:

* The use of sexualized language or imagery, and sexual attention or
  advances of any kind
* Trolling, insulting or derogatory comments, and personal or political attacks
* Public or private harassment
* Publishing others' private information, such as a physical or email
  address, without their explicit permission
* Other conduct which could reasonably be considered inappropriate in a
  professional setting

## Enforcement Responsibilities

Community leaders are responsible for clarifying and enforcing our standards of
acceptable behavior and will take appropriate and fair corrective action in
response to any behavior that they deem inappropriate, threatening, offensive,
or harmful.

Community leaders have the right and responsibility to remove, edit, or reject
comments, commits, code, wiki edits, issues, and other contributions that are
not aligned to this Code of Conduct, and will communicate reasons for moderation
decisions when appropriate.

## Scope

This Code of Conduct applies within all community spaces, and also applies when
an individual is officially representing the community in public spaces.
Examples of representing our community include using an official e-mail address,
posting via an official social media account, or acting as an appointed
representative at an online or offline event.

## Enforcement

Instances of abusive, harassing, or otherwise unacceptable behavior may be
reported to the community leaders responsible for enforcement at
.
All complaints will be reviewed and investigated promptly and fairly.

All community leaders are obligated to respect the privacy and security of the
reporter of any incident.

## Enforcement Guidelines

Community leaders will follow these Community Impact Guidelines in determining
the consequences for any action they deem in violation of this Code of Conduct:

### 1. Correction

**Community Impact**: Use of inappropriate language or other behavior deemed
unprofessional or unwelcome in the community.

**Consequence**: A private, written warning from community leaders, providing
clarity around the nature of the violation and an explanation of why the
behavior was inappropriate. A public apology may be requested.

### 2. Warning

**Community Impact**: A violation through a single incident or series
of actions.

**Consequence**: A warning with consequences for continued behavior. No
interaction with the people involved, including unsolicited interaction with
those enforcing the Code of Conduct, for a specified period of time. This
includes avoiding interactions in community spaces as well as external channels
like social media. Violating these terms may lead to a temporary or
permanent ban.

### 3. Temporary Ban

**Community Impact**: A serious violation of community standards, including
sustained inappropriate behavior.

**Consequence**: A temporary ban from any sort of interaction or public
communication with the community for a specified period of time. No public or
private interaction with the people involved, including unsolicited interaction
with those enforcing the Code of Conduct, is allowed during this period.
Violating these terms may lead to a permanent ban.

### 4. Permanent Ban

**Community Impact**: Demonstrating a pattern of violation of community
standards, including sustained inappropriate behavior,  harassment of an
individual, or aggression toward or disparagement of classes of individuals.

**Consequence**: A permanent ban from any sort of public interaction within
the community.

## Attribution

This Code of Conduct is adapted from the [Contributor Covenant][homepage],
version 2.0, available at
https://www.contributor-covenant.org/version/2/0/code_of_conduct.html.

Community Impact Guidelines were inspired by [Mozilla's code of conduct
enforcement ladder](https://github.com/mozilla/diversity).

[homepage]: https://www.contributor-covenant.org

For answers to common questions about this code of conduct, see the FAQ at
https://www.contributor-covenant.org/faq. Translations are available at
https://www.contributor-covenant.org/translations.
Background Review 
Informative · Media
Here, I will review some basic mathematical concepts using equations, images, or codes. Please note that you must understand these concepts to avoid difficulty following this course.
Convolution Operation
Convolution is a mathematical operation used as a building block for describing systems.
It has proven to be highly effective in machine learning and deep learning.
Convolution operation often denoted with a * symbol.
Assume there is a matrix, A, which we want to convolve with some other matrix, also known as the kernel, K.

One can define such a matrix and a kernel using Torch in Python:
a = torch.tensor(
                 [
                  [1, 5, 9, 2, 3],
                  [4, 8, 2, 3, 6],
                  [7, 2, 0, 1, 3],
                  [9, 6, 4, 2, 5],
                  [2, 3, 5, 7, 4]
                 ]
                )
k = torch.tensor(
                 [
                  [-1, 2, -3],
                  [ 3, 5,  7],
                  [-4, 9, -2]
                 ]
                )
To convolve these two matrices without losing information, we first have to go through a mathematical operation called zero padding.

To zeropad the matrix A, you can rely on Odak:
Note that we pass here size as [7, 7], the logic of this is very simple.
Our original matrix was five by five if you add a zero along two axis, you get seven by seven as the new requested size.
Also note that our kernel is three by three.
There could be cases where there is a larger kernel size.
In those cases, you want to zeropad half the size of kernel (e.g., original size plus half the kernel size, a.shape[0] + k.shape[0] // 2).
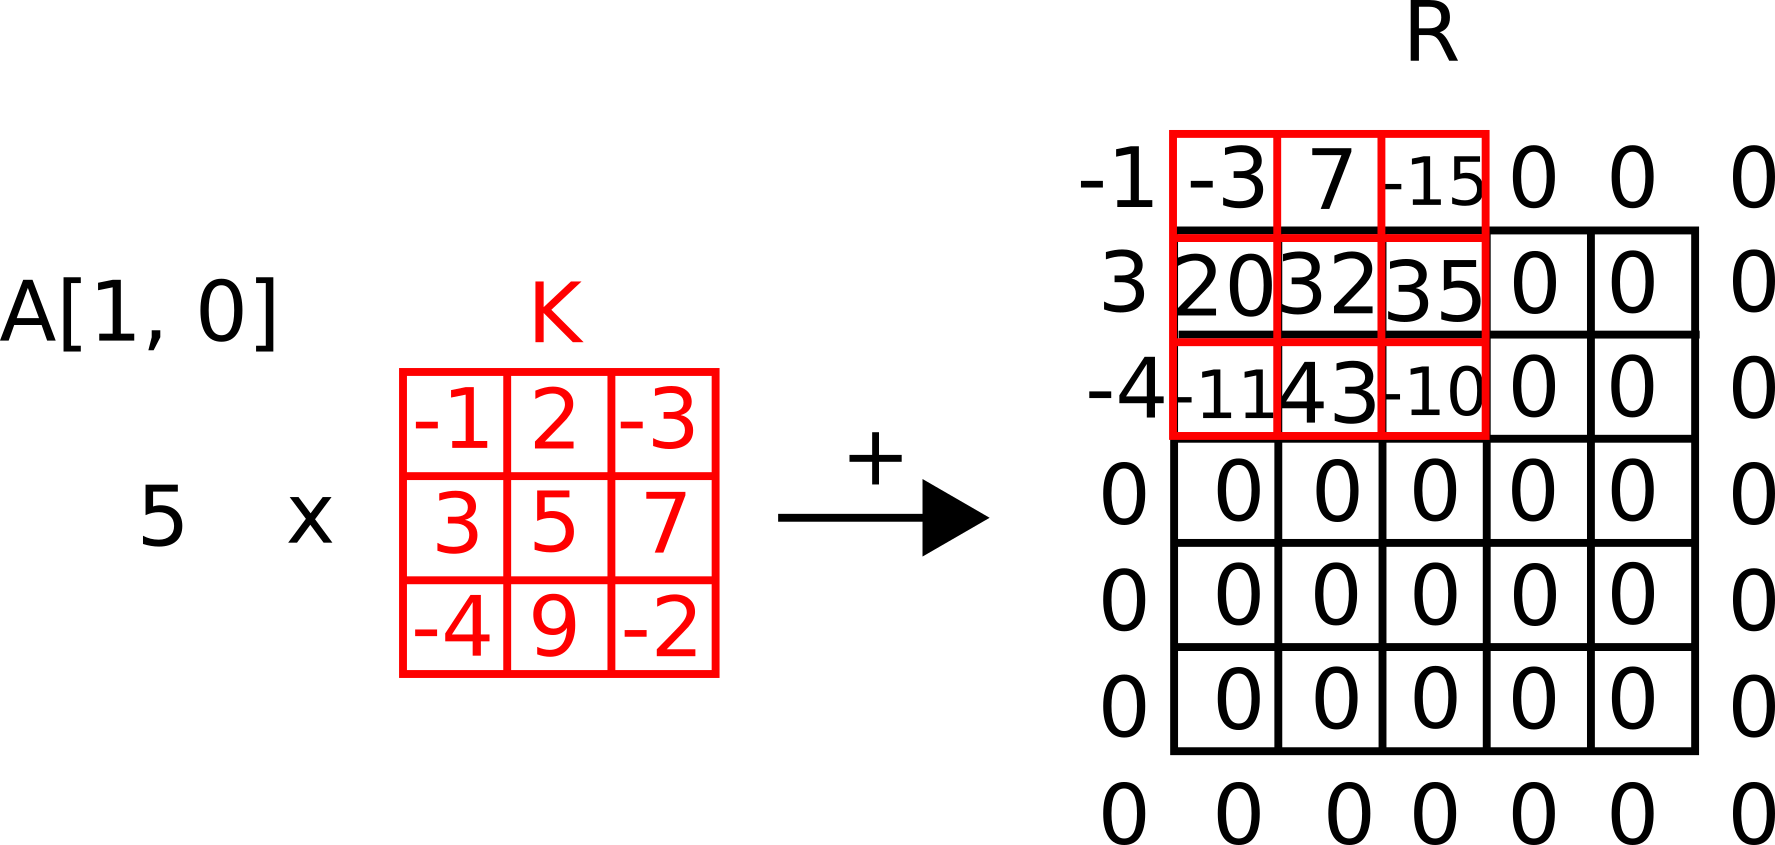
Now we choose the first element in the original matrix A, multiply it with the kernel, and add it to a matrix R.
But note that we add the results of our summation by centring it with the original location of the first element.
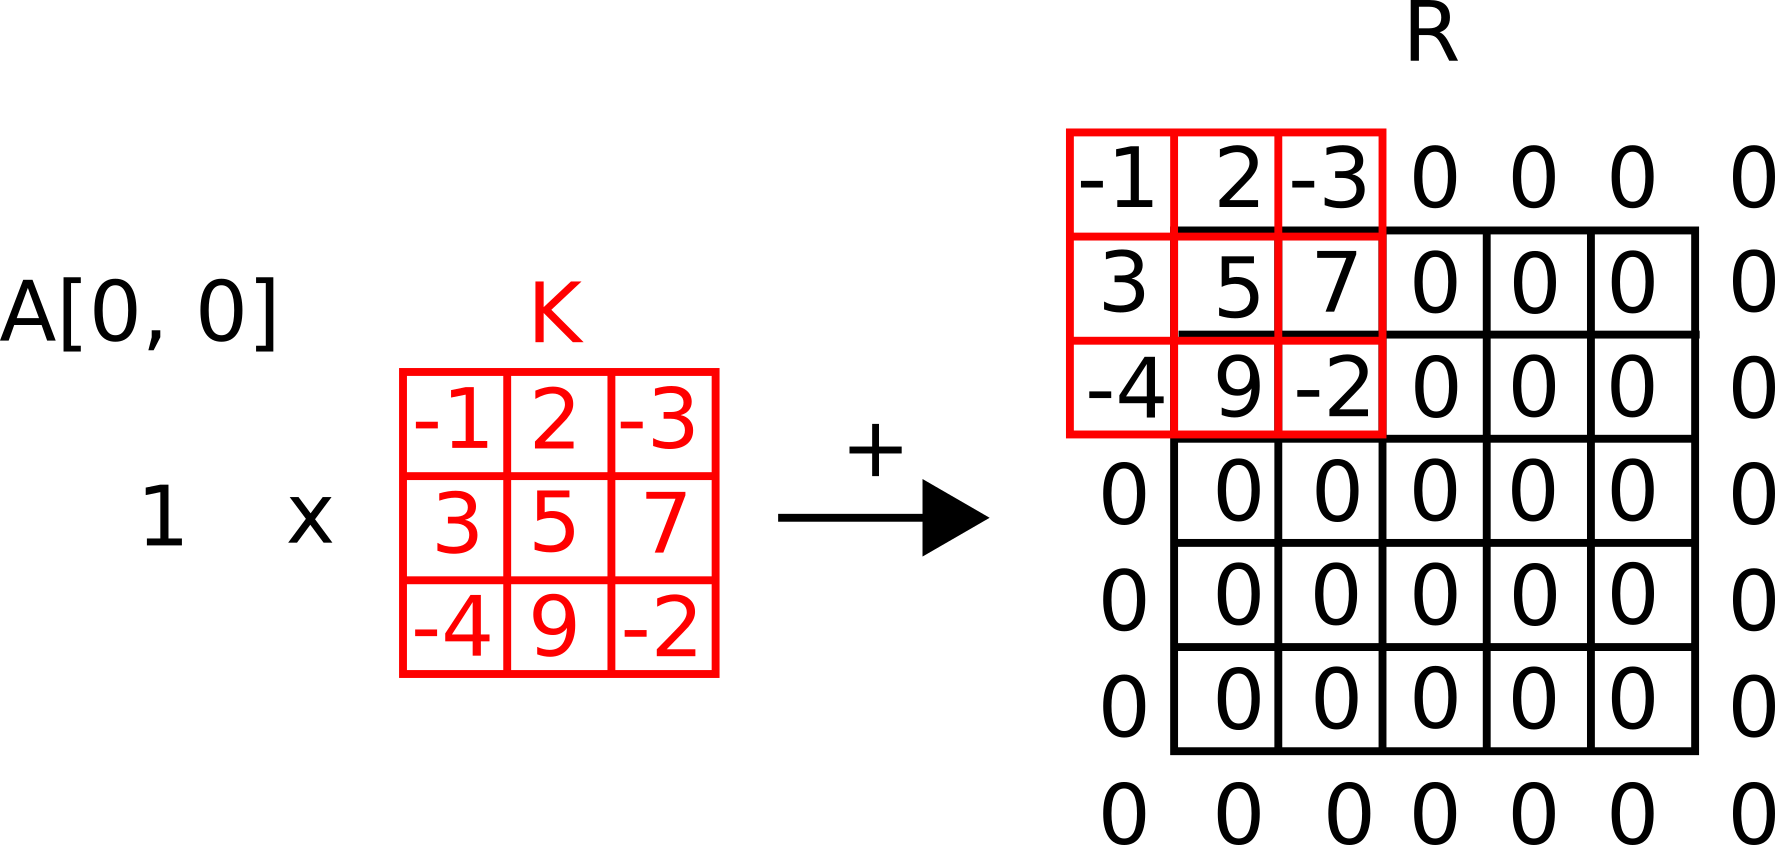
We have to repeat this operation for each element in our original matrix and accummulate a result.
Note that there are other ways to describe and implement the convolution operation. Thus far, this definition formulates a simplistic description for convolution.
Lab work: Implement convolution operation using Numpy
There are three possible ways to implement convolution operation on a computer. The first one involves loops visiting each point in a given data. The second involves formulating a convolution operation as matrix multiplication, and the final one involves implementing convolution as a multiplication operation in the Fourier domain. Implement all these three methods using Jupyter Notebooks and visually prove that they are all functioning correctly with various kernels (e.g., convolving image with a kernel). Listed source files below may inspire your implementation in various means. Note that the below code is based on Torch but not Numpy.
Definition to convolve a field with a kernel by multiplying in frequency space.
Parameters:
-
field–Input field with MxN shape. -
kernel–Input kernel with MxN shape.
Returns:
-
new_field(tensor) –Convolved field.
Source code in odak/learn/tools/matrix.py
Generate 2D Gaussian kernel. Inspired from https://stackoverflow.com/questions/29731726/how-to-calculate-a-gaussian-kernel-matrix-efficiently-in-numpy
Parameters:
-
kernel_length(list, default:[21, 21]) –Length of the Gaussian kernel along X and Y axes. -
nsigma–Sigma of the Gaussian kernel along X and Y axes. -
mu–Mu of the Gaussian kernel along X and Y axes. -
normalize–If set True, normalize the output.
Returns:
-
kernel_2d(tensor) –Generated Gaussian kernel.
Source code in odak/learn/tools/matrix.py
import odak
import torch
import sys


def main():
    filename_image = '../media/10591010993_80c7cb37a6_c.jpg'
    image = odak.learn.tools.load_image(filename_image, normalizeby = 255., torch_style = True)[0:3].unsqueeze(0)
    kernel = odak.learn.tools.generate_2d_gaussian(kernel_length = [12, 12], nsigma = [21, 21])
    kernel = kernel / kernel.max()
    result = torch.zeros_like(image)
    result = odak.learn.tools.zero_pad(result, size = [image.shape[-2] + kernel.shape[0], image.shape[-1] + kernel.shape[1]])
    step = 0
    for i in range(image.shape[-2]):
        for j in range(image.shape[-1]):
            for ch in range(image.shape[-3]):
                element = image[:, ch, i, j]
                add = kernel * element
                result[:, ch, i : i + kernel.shape[0], j : j + kernel.shape[1]] += add
            if (i * image.shape[-1] + j) % 1e4 == 0:
                filename = 'step_{:04d}.png'.format(step)
                odak.learn.tools.save_image( filename, result, cmin = 0., cmax = 100.)
                step += 1
    cmd = ['convert', '-delay', '1', '-loop', '0', '*.png', '../media/convolution_animation.gif']
    odak.tools.shell_command(cmd)
    cmd = ['rm', '*.png']
    odak.tools.shell_command(cmd)


if __name__ == '__main__':
    sys.exit(main())
In summary, the convolution operation is heavily used in describing optical systems, computer vision-related algorithms, and state-of-the-art machine learning techniques. Thus, understanding this mathematical operation is extremely important not only for this course but also for undergraduate and graduate-level courses. As an example, let's see step by step how a sample image provided below is convolved:

and the original image is as below:
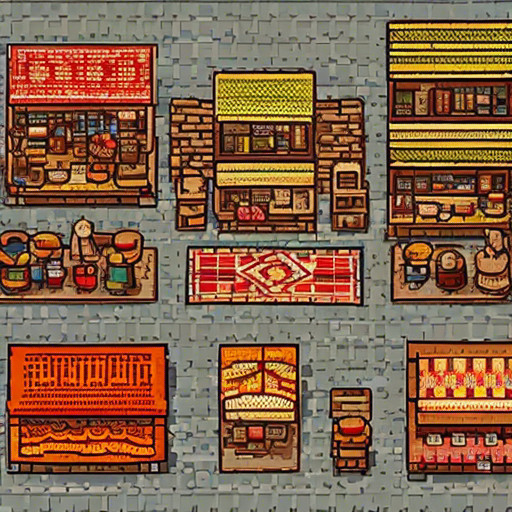
Note that the source image shown above is generated with a generative model. As a side note, I strongly suggest you to have familiarity with several models for generating test images, audio or any other type of media. This way, you can remove your dependency to others in various means.
Lab work: Convolve an image with a Gaussian kernel
Using Odak and Torch, blur an image using a Gaussian kernel. Also try compiling an animation like the one shown above using Matplotlib. Use the below solution as a last resort, try compiling your code. The code below is tested under Ubuntu operating system.
import odak
import torch
import sys


def main():
    filename_image = '../media/10591010993_80c7cb37a6_c.jpg'
    image = odak.learn.tools.load_image(filename_image, normalizeby = 255., torch_style = True)[0:3].unsqueeze(0)
    kernel = odak.learn.tools.generate_2d_gaussian(kernel_length = [12, 12], nsigma = [21, 21])
    kernel = kernel / kernel.max()
    result = torch.zeros_like(image)
    result = odak.learn.tools.zero_pad(result, size = [image.shape[-2] + kernel.shape[0], image.shape[-1] + kernel.shape[1]])
    step = 0
    for i in range(image.shape[-2]):
        for j in range(image.shape[-1]):
            for ch in range(image.shape[-3]):
                element = image[:, ch, i, j]
                add = kernel * element
                result[:, ch, i : i + kernel.shape[0], j : j + kernel.shape[1]] += add
            if (i * image.shape[-1] + j) % 1e4 == 0:
                filename = 'step_{:04d}.png'.format(step)
                odak.learn.tools.save_image( filename, result, cmin = 0., cmax = 100.)
                step += 1
    cmd = ['convert', '-delay', '1', '-loop', '0', '*.png', '../media/convolution_animation.gif']
    odak.tools.shell_command(cmd)
    cmd = ['rm', '*.png']
    odak.tools.shell_command(cmd)


if __name__ == '__main__':
    sys.exit(main())
Gradient Descent Optimizers
Throughout this course, we will have to optimize variables to generate a solution for our problems. Thus, we need a scalable method to optimize various variables in future problems and tasks. We will not review optimizers in this section but provide a working solution. You can learn more about optimizers through other courses offered within our curriculum or through suggested readings. State-of-the-art Gradient Descent (GD) optimizers could play a key role here. Significantly, Stochastic Gradient Descent (SGD) optimizers can help resolve our problems in the future with a reasonable memory footprint. This is because GD updates its weights by visiting every sample in a dataset, whereas SGD can update using only randomly chosen data from that dataset. Thus, SGD requires less memory for each update.
Where can I read more about the state-of-the-art Stochastic Gradient Descent optimizer?
To learn more, please read Paszke, Adam, Sam Gross, Soumith Chintala, Gregory Chanan, Edward Yang, Zachary DeVito, Zeming Lin, Alban Desmaison, Luca Antiga, and Adam Lerer. "Automatic differentiation in pytorch." (2017). 1
Would you like to code your Gradient Descent based optimizer ground up?
In case you are interested in coding your Gradient Descent-based optimizer from the ground up, consider watching this tutorial online where I code the optimizer using only Numpy:
import numpy as np
import sys
import odak


def gradient_function(x, y, function, parameters):
    solution = function(x, parameters)
    gradient = np.array([
                         -2 * x**2 * (y - solution),
                         -2 * x * (y- solution),
                         -2 * (y - solution)
                        ])
    return gradient


def function(x, parameters):
    y = parameters[0] * x**2 + parameters[1] * x + parameters[2]
    return y


def l2_loss(a, b):
    loss = np.sum((a - b)**2)
    return loss


def test():
    x = np.linspace(0, 1., 20)
    y = function(x, parameters=[2., 1., 10.])

    learning_rate = 5e-1
    iteration_number = 2000
    initial_parameters = np.array([10., 10., 0.])
    estimated_parameters = odak.fit.gradient_descent_1d(
                                                        input_data=x,
                                                        ground_truth_data=y,
                                                        function=function,
                                                        loss_function=l2_loss,
                                                        gradient_function=gradient_function,
                                                        parameters=initial_parameters,
                                                        learning_rate=learning_rate,
                                                        iteration_number=iteration_number
                                                       )
    assert True == True


if __name__ == '__main__':
   sys.exit(test())
Torch is a blessing for people that optimizes or trains with their algorithm.
Torch also comes with a set of state-of-the-art optimizers.
One of these optimizers is called the ADAM optimizer, torch.optim.Adam.
Let's observe the below example to make sense of how this optimizer can help us to optimize various variables.
import torch
import odak
import sys # (1)


def forward(x, m, n): # (2)
    y = m * x + n
    return y


def main():
    m = torch.tensor([100.], requires_grad = True)
    n = torch.tensor([0.], requires_grad = True) # (3)
    x_vals = torch.tensor([1., 2., 3., 100.])
    y_vals = torch.tensor([5., 6., 7., 101.]) # (4)
    optimizer = torch.optim.Adam([m, n], lr = 5e1) # (5)
    loss_function = torch.nn.MSELoss() # (6)
    for step in range(1000):
        optimizer.zero_grad() # (7)
        y_estimate = forward(x_vals, m, n) # (8)
        loss = loss_function(y_estimate, y_vals) # (9)
        loss.backward(retain_graph = True)
        optimizer.step() # (10)
        print('Step: {}, Loss: {}'.format(step, loss.item()))
    print(m, n)


if __name__ == '__main__':
    sys.exit(main())
- Required libraries are imported.
- Let's assume that we are aiming to fit a line to some data (y = mx + n).
- As we are aiming to fit a line, we have to find a proper m and n for our line (y = mx + n).
Pay attention to the fact that we have to make these variables differentiable by setting
requires_grad = True. - Here is a sample dataset of X and Y values.
- We define an Adam optimizer and ask our optimizer to optimize m and n.
- We need some metric to identify if we are optimizer is optimizing correctly. Here, we choose a L2 norm (least mean square) as our metric.
- We clear graph before each iteration.
- We make our estimation for Y values using the most current m and n values suggested by the optimizer.
- We compare our estimation with original Y values to help our optimizer update m and n values.
- Loss and optimizer help us move in the right direction for updating m and n values.
Conclusion
We covered a lot of grounds in terms of coding standards, how to organize a project repository, and how basic things work in odak and Torch. Please ensure you understand the essential information in this section. Please note that we will use this information in this course's following sections and stages.
Consider revisiting this chapter
Remember that you can always revisit this chapter as you progress with the course and as you need it. This chapter is vital for establishing a means to complete your assignments and could help formulate a suitable base to collaborate and work with my research group in the future or other experts in the field.
Did you know that Computer Science misses basic tool education?
The classes that Computer Science programs offer around the globe are commonly missing basic tool education. Students often spend a large amount of time to learn tools while they are also learning an advanced topic. This section of our course gave you a quick overview. But you may want to go beyond and learn more about many more basic aspects of Computer Science such as using shell tools, editors, metaprogramming or security. The missing semester of your CS education offers an online resource for you to follow up and learn more. The content of the mentioned course is mostly developed by instructors from Massachusetts Institute of Technology.
Reminder
We host a Slack group with more than 300 members. This Slack group focuses on the topics of rendering, perception, displays and cameras. The group is open to public and you can become a member by following this link. Readers can get in-touch with the wider community using this public group.
-
Adam Paszke, Sam Gross, Soumith Chintala, Gregory Chanan, Edward Yang, Zachary DeVito, Zeming Lin, Alban Desmaison, Luca Antiga, and Adam Lerer. Automatic differentiation in pytorch. NIPS 2017 Workshop Autodiff, 2017. ↩